
In the second part of our guide to moving lights control with the Cham Sys MagicQ, we take the previously patched fixtures and manipulate them into palettes while understanding what goes on inside the Programmer.
OK, so if you have followed the On Stage Lighting MagicQ tutorials so far you should have a pretty good understanding of how to find your way around the desk, patch dimmers and moving heads, save show files and create cues. We have also looked at using the built in effects engine and dealing with fade times.
Today we are going to continue using the show file we created last time, with the free Capture Robe Awards .exe file, to get to grips with manipulating the heads and their attributes such as Colour and Position. By creating some palettes, we’ll also get our heads round the business end of the professional based lighting console, the programmer.
I will warn you now, if you are into fiddling with effects engines, making big looks and banging them onto a playback to impress yer mates this tutorial ain’t gonna suddenly create top notch lighting for you. We are going to take it ultra slow to give you the knowledge to make that killer lighting on your own and avoid going around in circles.
Last time, we quickly created a Home palette as a fix for the Spots which are rigged “sideways” (default tilts on-and-off stage, not up-down stage). As we then altered the fixture personality using the Head Editor, our Home palette became redundant so let’s get rid of it. If you remember from earlier tutorials, to delete something on the MagicQ you hit REM(ove) [bottom right hardbutton], then select it and confirm. Delete Pos Palette 11 “Home” now.
Making An Intensity Only Playback
As the start of any programming session usually involves some palette creation or editing, we need to be able to see the fixtures as we work on them. You could set the fixture Dimmers to 100% every time you start a new palette but this kinda wastes time and, depending on what you are doing, impacts your programming. So what we want is a way of leaving the Spot1200s on, even when you CLEAR information from the programmer – a Spot On playback it is, then.
Hit CLEAR like a good operator should. This dumps everything from your most important tool, the Programmer, an area of memory used to build stuff to be recorded. If you need a recap on the function of the Programmer, check out our article and/or revisit the earlier tutorials.
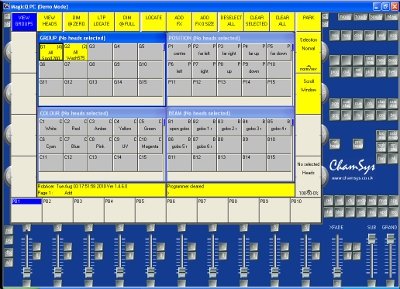
BTW, you can see that there is nothing in there by pressing PROG and looking in the Programmer window. While we are here, why not send that window to your External Screen (with your Capture view on it) by pressing EXT in the window controls while it is active. The Prog window should appear on your external screen, adjust using the Size window button, mine is currently filling the bottom half of my external screen with the visualiser above it The Groups, Position, Colour and Beam windows fill the main MagicQ screen. Update this layout to the Palettes view by pressing REC, then CTRL + “Palettes” [top soft].
Select All Spot1200, then the top softbutton DIM @ FULL to see the spots on. Now look in the Programmer window, you’ll see that the four heads have their dimmer attribute highlighted in red, reading 100%. All the other attributes such as Pan, Tilt etc are not highlighted nor have a number in them. This is important to understand. Even though the heads are in Open White, No Gobo and all have a position, there is no data about these attributes and nothing but Dimmer will be recorded right now.

Note: If anything other than Dim data is highlighted, check Setup -> View Settings -> Prog -> Activate Chans/Head = Chans. While we are here, check that Recording to Palettes = All heads in programmer, it’ll save a ton of confusion later.
Record this data as “SPOT ON” on PB10.
CLEAR the Programmer again and raise PB10 to see the Spots fade up and down with the fader. We don’t need to press the playback Go (>) button because the default setting for playbacks should be “Playback Activates Stack” (found in the playback options by double clicking the softbutton or “S” button above the fader.) As the PB is also “Fader Controls HTP”, the Dimmer data adjusts with the fader level.
This SPOT ON state is not only a tool for seeing the heads as we create palettes, it is also a major playback used when busking concert lighting using subs – it can be a master intensity control to run the show with. Having faders that control just intensity, you can pull them down, adjust your heads to a new busked look using palettes, and fade back in again when you are ready.
Leave the fader up and create another PB9 – WASH ON and stick that up too so we can see all the heads.
Back to the palettes. CLEAR the Programmer if any data has snuck in there.
We are going to create a beam look in the crowd. First, select both spots and washes by shift+clicking both “All” groups. Activate the Pos window and wind the tilts outward toward the audience. Look at the Programmer, you only have Tilt information so far, RECORD that look as Crowd Beam on Pos 11 before pressing the top right softbutton View Palette. You can see that you only have Tilt information in that palette, the Pan field is blank – there is no Pan value in the palette. Hit Close Window.

We are moving along slowly right now because it’s important to hammer home some really basic concepts in moving light programming that can really mess your day up. They can make your life a misery as things you thought you programmed seem to appear and disappear by magic.
Let’s test this Tilt Only palette by first changing the Pan and Tilt values by hand, quick and dirty, big change. Now, select Crowd Beam. Erk, something is not looking right, this isn’t the look we had. Looking in the Programmer window, we can see “crowd beam” in the tilt value but the pan is unchanged.
Well, we did only record Tilt information didn’t we?
I’d reckon it is safe to say that the number of times you want to record a palette with a Tilt but no Pan is pretty limited but that the number of times you will do just that is potentially limitless.
Sort this position out and make sure the Pan is also set in the Programmer by nudging the encoder a little. This has been a standard workaround on other moving light controls, a way to make sure that data is entered even if the value remains unchanged.
Note: The MagicQ also has shortcuts for making sure you have attributes “active” in the programmer, by holding COL and pressing SET for example. There are a number of cool shortcuts that involve press/hold moves (POS + LOCATE sets the position attributes only to default) but for the life of me I can’t work out how to achieve that on the MagicQ PC using the screen only interface.
Re save (edit) this updated palette with REC -> P11 and confirm the update.
Using The Fan Tool
While we have our beams out in the crowd, why not make up some fan positions while we are here. Select All Spot 1200, click and hold the FAN button [right] and select Asym and All before winding the Pan values so the heads form a knot, truss heads pointing toward centre. Make sure that both you have both Pan and Tilt values in the programmer.
Leaving the crowd beam from the previous palette creates nested data that can either be incredibly powerful or really ruin your day when you make a single palette update that changes the whole show. Do the same with your Washes, setting them maybe to fan outward, the FAN button needs to be lit to be activated.
Select all the heads, type 5 and select Magenta. You have now learned how to recall a palette over a time, in this case 5 seconds. If you have ready any of our articles on busking concert lighting, you might get how useful this is.
Save this brand new position palette at Crowd Fan. When that’s done, play about with the other Fan function settings and see if you can work out what they do.
Attribute Masking and Nested Palettes
So far, with our two Position palettes and our Dimmer playbacks, we’ve seen the effect of recording specific data in different places.
You will notice that all the Position palette slots have a P in the top right hand corner, the Colour slots have a C and guess what, the Beams have a B. This is because the MagicQ, by default, sets an appropriate “mask” for the palette type and only records this information, ignoring others. We know that we set our Crowd Fan to magenta but Pos12 still only shows a P. Turning all the heads back to Open White then recalling Pos12 does nothing to the heads in terms of colour.
This shows that, when recording palettes, attribute masking controls what goes into the palette regardless of what you see on stage. By default, only the relevant attributes (and then only those in the programmer at the time) get recorded. But we can change that so to illustrate that, let’s go a little of piste.
Let’s say that we want our Fan position palette to include magenta. So we don’t mess up our original, we’ll make a copy of that palette COPY -> P12 -> P15. Make all the head magenta using palette C10 then Shift+REC opens a window with all possible attributes listed, select those that you wish you record, in this case : Pan, Tilt, Col1, Cyan, Mag, Yellow,

Hit Close Options [top softbutton] then overwrite P15, you will see a C appear as well as the P in the top right corner. Now we have Colour and Position information in what was a Position only Palette.

Rename that to Mag Fan with SET -> P15. OK, so a position palette with colour forced into it is not going to be your most useful go-to but while we are off the beaten track, let’s use it to demonstrate the concept of nested palettes.
Selecting P15 and hitting View Palette shows us that the Colour data is the Magenta palette, not simply DMX values. Let’s decide that the Magenta palettes needs a little tweak, a bit more blue for example.
Hit INC [bottom right] then pick the C10 Magenta palette. This loads all the data used in that palette into the programmer, ready for editing. Crank up the Cyan value using the top left encoder and reduce the Magenta a bit, to create a much bluer magenta in the visualiser, one that is markedly different to the original.
Now set the heads into Open White etc. before picking Pos15 again. You will see that, not only did we edit the magenta palette but that the change has been reflected in any palettes created with it, in this case our Mag Fan “position”. You can start to see how it might be possible to build memories, using layers of palettes within palettes, that can be easily edited console wide at base level, in this case the magenta palette.
If you are using your desk in a non-theatre stack environment (using “tracking” to achieve show wide complex edits in a single shot), this concept could prove useful.
But…
The real reason for illustrating the concept of nested palettes is to help you avoid accidentally creating them within your show. Suppose you set your CMY fixtures to Red using the pre-programmed colour palettes for speed, then tweak the magenta encoder to make the result more amber. You currently have an Mag value in numeric form, but the C and Y values in the programmer still relate to the palette Red. If you save that as a new palette now, any changes to Red will also be reflected in the new palette.
To avoid doing this, you should be looking to set your colour palettes from scratch using the encoders or the colour mix facility on the MagicQ but selecting Col Mix from the top left softbutton and choosing a library item from Lee or Rosco or even using the rainbow field to pick your colour.
Don’t forget that this doesn’t just apply to colour palettes. Using any palette as the basis for another can spell trouble. Remember that the data displayed in the Programmer window is more important than what you can see on stage when it comes to understanding how you are storing attribute information.
If you head is completely pickled by all this and you just want out, we’ll finish by getting rid of that pesky colour data in our lovely position palette using Record Remove.
Record Remove – Get Me Outta Here
Record Remove is a quick tool for targetting specific data within a palette or memory and deleting it. In this case, we want rid of the colour in our Pos15 palette so let’s start by loading that into the programmer: INClude -> Pos15. Now the palette is there, simply Shift+REC to get the Record Options window back, choose Rec Colour from the top (which auto selects all colour attributes) and also Rec Remove option, top right. Close Options with the softbutton and click Pos15, confirm. Check your work with View Palette. Only Pan and Tilt information remains, we just told the Colour data to take a running jump in a few button pushes.

Enough, already.
OK, so I did warn you that it might get tough around here today. Unlike earlier tutorials, we have not simply followed a set of steps to create a nice look and save it. By now you should be familiar enough with the basics of the MagicQ to be able to do that, with a bit of practice to remind yourself of the workflow.
How about a recap?
- Attribute data active in the programmer is available to record with, despite the look on stage.
- It’s important that you are aware of which attributes are active and if palettes are going to be accidentally nested.
- The Col, Beam, Pos palettes select their own data type from the programmer when recording, but you can override this.
- You can select which attributes are recorded back out of the programmer using Shift + REC.
- Use Record Remove to easily dump specific data from a recorded memory or palette.
To lighten things up a bit, it’s your turn to go nuts and play with stuff rather than getting bogged down in the grubby detail of programmers and attributes.
If you’ve been following along, you have more than enough knowledge to set up some looks, create some position palettes on stage and even try to get the effects engine up and running with the moving lights. Here’s a few ideas to try out.
- Try to get all your Spots on the singer using different selection tools such as Nxt Head highlight or manipulating pairs using Fan.
- Try out the Odd/Even selection button and experiment with the different Fan settings.
- Have a go at creating some palettes that spin the current gobo at Slow, Fast or Stop – only spin, not reload a new gobo.
- Create In or Out selection groups or experiment with using the Fan function on attributes such as colour.
- Create a look, then see if you can pull data from a memory and turn it into a specific attribute palette.
Or you could just get the big looks out and try to impress yer mates.
Rob Sayer HND PGDip FHEA is a Senior Lecturer in Technical Theatre Production, mentor, and consultant in stage lighting and education. As a professional lighting designer, Rob designed and programmed theatre performances, music festivals and large corporate events for blue chip companies while travelling all over Europe. With a background in theatre, he combines traditional stage lighting knowledge alongside fast moving lighting and video technology in the world of commercial events.
Thank you for the time you are spending on these tutorials….
I really appreciate your efforts.
Thanks for all your work with these tutorials.. when can we look forward to the next installment? Do you need a proof reader/beta tester to check it? ;)
More importantly, did you manage to work out a way of doing a ‘Hold A, Press B’ manoeuvre on the PC software? A quick google hasn’t uncovered anything, but I might not have looked hard enough.
Great job. Can hardly wait for more MagicQ tutorials!!!
Your Tutorials are much appreciated. Thank you for putting the time in. I got a lot out of them.
Dara