In the first of our moving light control tutorials using the Cham Sys MagicQ, we find out how to patch and wrangle intelligent fixtures and follow our progress on a virtual stage using the Capture visualiser.
The On Stage Lighting MagicQ tutorials are designed for readers to get to know the console and learn a a few general programming tricks along the way. All the material is planned for use on the free MagicQ PC software so you can try it at home, but everything learned is equally applicable to any of the real consoles from Cham Sys and many other professional desks too.
This tutorial assumes that you have the knowledge gained from the previous MagicQ 1,2 and 3 including navigating the desk and the basic skills to patch, program and manage show data. If you’ve forgotten (it has been a while) you might want to go back and revisit but just to be clear we are going to be working on a totally different rig with a brand new show file than the previous tutorials.
In these moving light sessions we will also be using a free Capture .exe file that Cham Sys have made available for learning purposes. The file consists of a virtual lighting set up that is executable on your PC without the need to have Capture installed or licenced. Using the MagicQ’s visualiser link, we can easily run both the MagicQ PC software and the visualiser on the same PC although it is handy to have more screen area to accommodate both apps. To create these tutorials, I am using a pretty old XP laptop with an external monitor – MagicQ on laptop screen, Capture moved to the extended desktop on the external.
So, assuming you already have the MagicQ PCsoftware installed (this tutorial was prepare on 1.4.6.0) , you will also need to download and unzip the Capture .exe file called Robe Demo, also available from the Cham Sys downloads site. I am using the Robe Demo Artnet version but I think that using the visualiser on the same PC, it doesn’t really matter. Cham Sys also have a MQ show file that goes with this rig with the patch and basic programming done but this doesn’t matter to us today. We are going to start a clean show, patch up a very small part of the rig and concentrate on the basics without too much desk clutter.
Start A New Show
Start the MQ and a New Show using SETUP -> New Show [top softbutton] (Remember, don’t worry that the desk asks you if you want to erase the current show, it’s a kinda scary prompt box that means you are making a clean start. If you have saved the previous show file, it doesn’t actually erase that show file). Select Normal (live).
While you are in the SETUP window you might usually take the time to adjust the desks setting to your liking, for me that often means setting the windows colour scheme to High Brightness ( I like yellow, so ner) but there isn’t much you need to worry about in apart from the visualiser connection.
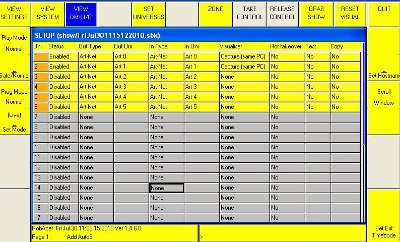
SETUP -> View DMX I/O [top] takes us to the I/O spreadsheet. We aren’t actually going to use an real outputs (like Artnet or another device) but we need to set up a connection for our Capture .exe file so looking right along the sheet, we need to find the column marked Visualiser, Shift + select universes 1 – 3 and hit Enter until Capture (same PC) appears. Alternatively you can double click on an individual field and choose from the prompt that appears. When you are happy, close the SETUP window with CLSE [top right]
Patching Some Moving Lights
Open the PTCH window [top right, next to SETUP], this is a brand new show so you should get a blank window, we haven’t patched anything yet. First we are going to patch four Robe Spot1200 ATs to Universe 2, starting at DMX address 097. If you remember the basics of the procedure to patch dimmer channels from previous tutorials, this is simlar but we first need to define which moving light personality we are going to use. Check out more about fixture personalities if you are unclear what they do.
With the PATCH window active, Choose Head [top softbutton] opens a the file that contains personalities for different manufacturers. Scroll or cursor down to Robe and click once to open the Robe list, then find Spot1200 and select Mode 4 (24) at the prompt. If you hadn’t guessed, 24 is the number of channels used for Mode 4, a manufacturer setting that defines how the fixture behaves.
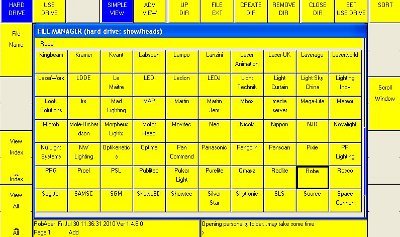
Having selected your head personality, the next step is to patch 4 to Universe 2 starting at DMX 097. If you remember the syntax at the command prompt is 4 @ 2-97 Enter (quantity @ Uni 2 starting at DMX 097) -> Patch It. That patches our first moving lights and they appear in the PATCH window. Before we move on, let’s just just tidy something up.
The four heads we have patched currently have been allocated Head Numbers 1 – 4. These numbers are the unique identifiers, independent of DMX addressses, that the console uses and that we can select individual heads at the the keypad. The Capture .exe file Robe Demo, doesn’t display these heads as 1-4 but rather 55-58. In the interests of clarity, let’s change ours. In the PATCH window, shift select all four Hd No and type in 55 Enter, that renumbers the heads. This is a good reminder of how easy it is to make changes in the spreadsheet view, a godsend when you are working with hundreds of fixtures.
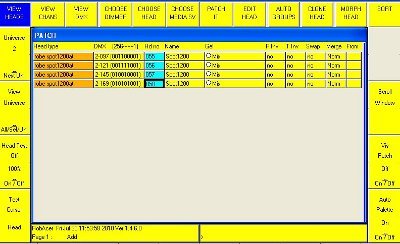
OK, so before we leave the PATCH window we are going to patch up a couple of Robe Wash 575s too. Starting at Choose Head [top], find Robe and then Wash575, selecting Mode 4. Now patch 2 heads on Uni 2 starting at DMX 21 ( 2@2-21 Enter -> Patch It). As above, change their Head Numbers to 91 and 92 to maintain show continuity with the Capture file.
Note: As you are a keen eyed sort, you might have noticed that there seems to be four wash lights on the deck downstage, not two. There is a reason we are only going to patch two for now, stick with me and you’ll find out why in a later session.
Connect to the Visualiser
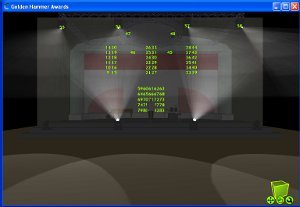
Before we go any further, we want to be able to see what we are doing by connecting up the visualiser. On your PC, navigate to the unzipped .exe Capture file and start it. You should see a stage and rig in wireframe. We want to be able to see better than that so click on the spanner icon in the bottom right and choose views 4 and W. If you want to move the view around, try clicking and dragging on the zoom and directions icon until you are happy. Then move the Capture screen somewhere where you can see both it at the MagicQ interface at the same time.
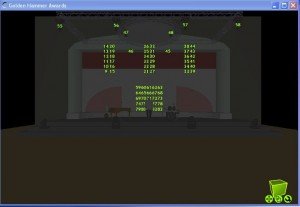
Now for the moment of truth. We’ve set up our visualiser link in the PATCH window, we’ve patched up some heads. I wonder if we can make them work?
Switch to the default Palettes view by holding down CRTL on your keyboard and selecting Palettes from the top left softbutton. Group 1 should be an auto generated group called All Spot1200. If there is nothing in your GROUP window, go back to PATCH -> Auto Groups [top] -> Head Groups [prompt]. This creates the main head groups for you.
Back in the Palettes view, select All Spot1200 -> Locate [top centre] and watch the vis. Four overhead spots should fire up in open white, pointing straight down. If not, check your settings in the SETUP -> DMX I/O window, “Capture (same PC)” and try hitting the Restart Visual softbutton, usually a combination of correct setting and rebooting the show and the vis does the trick.
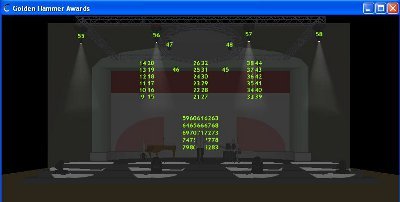
If you have the spots, try Locating the washes too: All Wash575 -> Locate.
Checking The Moving Lights
Another frequently used check is to see if your heads are uniquely addressed and appear where you expect them. In our case we could do All Spot -> Locate then hit the NXT HEAD button centre right of the screen. That should bring up only Spot 55 on it’s own and kill the rest. Hitting NXT HEAD again moves us on to Spot 56 and we can quickly chase around the rig, checking that there are no duplicate DMX addresses and that the fixtures are ordered in the way we expect – in an ideal world from left to right when viewed from the desk.
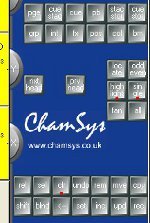
Across a bit from the NXT HEAD button are some selection option buttons with HIGHTLIGHT and SINGLE currently lit. Hitting ALL gives us back control over the group. During programming, this can be used to switch between adjusting and individual fixtures focus or position, before grabbing them all again to make a group wide change. You might remember that the trick with moving lights is to herd them like sheep before picking off individual fixtures to adjust, then herding them to the next point, a new colour, for example.
So, the heads are responding uniquely and appear where we think they should.
An important check for a moving light programmer early on is that the Pan and Tilts behave uniformly, fixtures have not been rigged incorrectly or have Inverts set at the heads themselves. So let’s do that with our Spots.
Clearing the programmer with CLR should dowse all the heads.
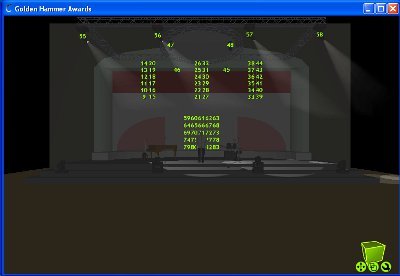
All Spot 1200 -> Locate -> POS window active (click the window chrome or POS button) then adjust the Tile encoder to lift the heads up a little, before checking the Pan to see if they all move in the same direction. They do but there is something bugging me, the spots are rigged “sideways” and tilt up to Stage Left, instead of Up Stage as I’d like. We are gonna fix that right now, it’ll annoy me for the rest of the programming and slow me up hugely. There a few ways to fix it and we’ll look at two of ’em.
Using A Palette
The simplest way, with any lighting console, is to create a Home palette that points the fixtures straight down with the correct Pan, let’s do that quickly. Hit Clear.
Select the Spots, Locate and then, using the encoder, bump the Pan value to about 168. Save that position as Home in Pos Palette 11 by hitting RECORD (REC), typing in “Home” and clicking P11 in the Position window. Now check your work. Locate the fixtures again, tilt up to see them going sideways, then hit Home palette and tilt up again – they should move upstage. Yay, order is restored once more, we just need to remember to use our Home palette as well as Locate.
But there is another way we could sort this out, by using the onboard fixture personality editor.
Changing The Locate Values Of A Fixture Personality
The Locate function is used to wipe the slate clean with a fixture, clear colours and gobos, set effects to defaults and point the fixture 50/50, ready for more programming. On the MagicQ it also serves another useful purpose relating to the programmer, but we’ll talk about that more later. Right now, we have spots that are rigged sideways on to the stage and we’d like it very much if the Locate function corrected that. We can do that at personality file level.
Opening the PATCH window, we need to choose the head personality file (.hed) we are going to edit using the Choose Head method we used while patching. Having selected Robe Spot1200 etc. click on Edit Head and check in View General – > Names that we are working on the correct one (Spot1200). Opening the View Chans window in Edit Head, we can see a lot of fixture personality information, the one we care about is the Locate column and the Pan field in particular.
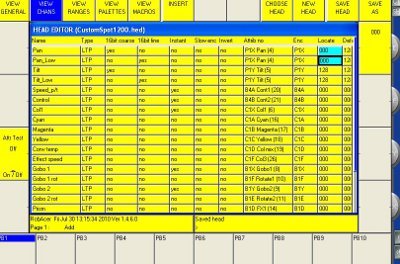
If you remember from our Home palette, we want Pan to be 168 or so, not 128, so change that field (leave the Pan Low value as it is) by selecting the field, typing 82 Enter. You have now altered the locate values in that personality file and you can check your work by Locating the Spots then winding the tilt, hopefully now straight up or down stage.
There are all kinds of ways you can alter, Save and Save As the personality file data but we won’t go further into this right now. At the moment, we have just made a temporary change in this show file to help us out with this rig.
Changing Pan and Tilt Inverts
In our article covering the use of Inverts, we sketched out different situations that a moving light programmer might make use inverts to sort out problems and speed up workflow. In order to understand the Fan function better using this rig, we won’t set any inverts today but changes to this parameter are made in the PATH window spreadsheet again. P Inv, T Inv and Swap (Swap Pan/Tilt, used to align fixtures hung on their side with the rest of the rig) can all be set on or off using the fields.
Right now, all our heads, Spots and Washes all move toward or away from the stage in unison, handy for creating those outward beam structures quickly.
Save Your Show File
OK, so now we have some heads patched and the virtual rig responding as we’d like, if you haven’t remember to already, save your show file using SETUP -> View Settings -> Save Show and type in a name.
It might seem that we haven’t covered much ground today, simply patching and organising the desk to fit with the rig we have. But, we have learned how to select personality files, patch up heads and change their Head Numbers, create a position palette, adjust a fixture personality file and set inverts at the desk. We’ve tested the fixtures are correctly patched and that the Pan and Tilts are behaving themselves. This is all a vital part of early programming, often being worked on while the crew are still slinging trusses and the reason that a programmer needs to be at the desk early on.
Check Other Attributes
As part of pre programming checks and to get a chance to play with the rig a little, why not go through all the other attributes: colour, gobo and effects etc and check that the desk and the rig agree. In a real situation, this is very important to do this to check that all the fixtures are set to the correct mode (if the Pan/Tilt check hasn’t already flagged a problem up) and you are using the right personality.
Select heads, hit palettes and fiddle about with encoders. Don’t forget that the function of the encoders changes with the active window, as do all the softbuttons, so if you don’t see what you expect, check which window you have active.
In the previous tutorials, you learned enough to be able to have a go at recording and naming memories, so why not have a go at that too. REC -> type name -> Playback S button. Right now, it’s advisable for you to Locate your heads before recording looks for reasons that we’ll uncover at the start of the next article when we continue our anti quick start tutorials through the MagicQ and program some tools and looks while discovering features of the desk.
See you then.
Rob Sayer HND PGDip FHEA is a Senior Lecturer in Technical Theatre Production, mentor, and consultant in stage lighting and education. As a professional lighting designer, Rob designed and programmed theatre performances, music festivals and large corporate events for blue chip companies while travelling all over Europe. With a background in theatre, he combines traditional stage lighting knowledge alongside fast moving lighting and video technology in the world of commercial events.

FOR SOME REASON I CANT LINK MY MAGIC Q WITH THE CAPTURE VISUALISOR, ANY IDEAS?
A very good programme. Very easy to use.
Hey,
very nice tutorials. That was very helpfull to get in touch with chamsys.
Would it be possible to make a tutorial about matrix and pixlemapping in Chamsys? I think the manual is a bit useless at this point.
Thank you for all your work
Hey,
Loved the tutorials also. Question is I’ve already purchased a dmxsoft interface. Is MagicQ compatible with this interface?
Myles B
The easy way to do this is go into the setup window and select DMX i/o
Once here there is a way of selecting the interface you want to use. if its not there it prob wont work.
or you could just Google it :-)