In the final part of our Cham Sys MagicQ PC Getting Started tutorials, we work to the final stage of preparing our show for the fictional 3 piece band using a simple rig of PARS. If you haven’t already done so, work through MagicQ Tutorials Part 1 and 2 before tackling this one.
In this tutorial we will create another page of playbacks, a short opening sequence using a theatre cue stack and use the FX generator to quickly make some snazzy effects with the Beam Fans. We will also look at some of the theatre stack timing options.
New:All three of the MagicQ conventional lighting control tutorials are available for download as an ebook (pdf), so you can print out and follow along.
Editing Cues
We already know how easy it is to record information into a cue (enter data into the programmer, hit REC and choose a playback), we haven’t yet learned how to edit that information after it has been stored.
Like most programmer based consoles, editing happens back in the Programmer and changes are usually output “live” to the stage while overriding any other playbacks that are running at the time. This means that you can edit parts of cues while leaving the other playbacks outputting and the end result will not mix your data up.
An example: During the sound check you are playing back out a two colour wash using two faders– Red and Blue. You want to adjust the levels in the Blue Wash only, editing that information in the programmer before saving it back to the Blue Wash fader.
A non programmer based desk that records output requires that you record individual cue information without other playbacks running (in this case, Red Wash) – a pain when you need to program or edit during rehearsals and don’t want to alter the entire look on stage.
But, the MagicQ is a programmer console and we can make individual changes and add them to specific cues.
Getting edit information into the Programmer
Different consoles have their own way of loading information into the programmer and the MagicQ PC has a few choices.
At it’s simplest, we just want to load the Blue Wash Cue into the programmer to be edited so we use INCLUDE (a term borrowed from Avolites) then Choose the S button the playback fader. This loads the entire cue in to the Programmer (the CLR button light shows that there is information there) and we can make changes to the levels using any method – Keypad, Groups and Encoder, Programmer spreadsheet or the Programmer Intensity Window.
When happy with the new levels (that are output to stage and override the current state of the fixtures we changed) pressing UPDATE. Depending on the SETUP – > Prog Settings, the programmer then either clears itself or leaves the data there for you to carry on working – adjusting levels and recording another cue, for example.
The reason you would like to leave values in the Programmer until you are ready to CLEAR them is you can use those values to record new cues, update old ones or even remove parts of other cues altogether. If the Programmer doesn’t clear itself, don’t forget that the levels will continue to override your stage look until you hit CLR. That’ll be why those blues are still up, even after you have moved on to another task.
All this talk of cue edits brings us neatly on to blind mode.
Blind Mode
If you have used any kind of memory lighting desk, you may have come across Blind Mode before. The concept is to enable you to record or edit cue information without it appearing live on stage. While the usefulness of not being able to see what you are doing can be a bit limited, using Blind Mode has been a traditional method of inputting “known” data (like dimmer levels recorded on an old fashioned channel sheet) while the show is running.
Imagine the electrician of a touring show, having not had enough time to put both acts into the house lighting console, carefully entering and recording the cue levels for Act II in blind mode during Act I. This is not a joke, it has happened on more than one occasion. Fortunately, we now we have improved desk reliability and better portability of show data.
Anyway, to enter Blind Mode on the MagicQ you just need to toggle the BLIND button and you will see that the results of programmer output are not reflected live on stage (as seen in the OUTPUT window). The recording and editing process remains the same.
It is important to understand the effects on stage of both the Programmer (overrides conflicting playback data) and Blind Mode (hides the Programmer data from live output) when you find things aren’t behaving as expected. To stop programmer data altering the output either CLEAR the programmer and dump everything in it or hit BLIND to hide it.
When it comes to using a programmer based console in a complex environment like rehearsing while you are programming, it pays to know exactly what is in the programmer. The PROG data window is your friend here but most operators also build a rough list of “things I have done since I last hit CLEAR” in their heads.
Default Cuelists
Before we add some playbacks to Page 2, let’s consider that we might want some faders to appear on every single playback page. How about the Blinders – they always come in handy. We could create a linked copy on multiple pages and on different faders but there is an easy way to make sure that a Memory, Stack or Chase appears in the same spot across every page. Called a Default Cuelist, we need to set it in the Playbacks windows which is opened using the PB [right]. Open the PB window.
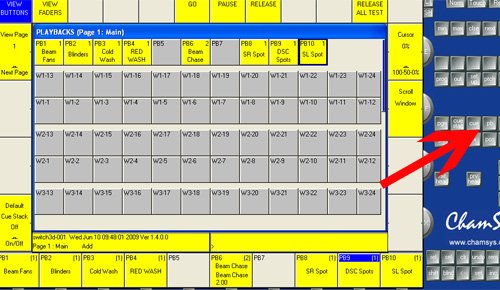
The Playback Window gives you a graphical view of the playbacks on the desk, can be used to organised playback layout and, most importantly, gives you access to playbacks that might not be physically available on your version of the MagicQ . As the show files are universal, there is a possibility that a show was created with an extra fader wing and memories place on playbacks that you don’t have buttons for. Wing / Extra playbacks are marked with a W-# and can be activated from the PB window.
But we just want to make our Blinders playback a default, so select it’s “S” button and look at the bottom left encoder – it has a Default On/Off toggle. Set it to On and you will notice that the Blinders playback now has DEF above it’s label. Now, which ever playback page you change to using NXT or PRV [Bottom Left], the Blinders remain available.
All shows are different but there is often a cue that you need constant access to.
Using Pages
Organising Playback pages very much depends on personal taste though some tips can be found at Using Submasters for Busking. Here are some different ways that programmers might organise pages for this kind of gig.
Song per page –This is a classic techniques that is good if you are touring a specific act with your own set programming on a per song basis. While the set list order changes, the actual cues per song don’t. The MagicQ even has a little feature lets you load a text file set list which it then uses to re order your song pages ready for the show that night.
Fast/Slow pages – When busking an unknown show, it’s useful to be able to flick to a page of stuff that you know fits the tempo.
Warm/Cold pages – Again, an unknown show – you decide if the next track is an upbeat sunny one or a moody, bluey one.
Main page and FX – I use this one quite a lot, it consists of a Home page to keep most things you regularly need like colour washes and “backing” stuff. A page above, and sometimes below, are variations on the playback which include FX like Pan/Tilt Movement or Intensity effects.
How you organise PBs is entirely up to you. The goal is to make sure that you are able to spend the maximum amount of time looking at the stage and keep up with the show. In this tutorial series, we are looking at different features of the MagicQ PC so the actual page layouts are not meant to be examples of the best method.
Creating a theatre stack
Next, we are going to create an opening sequence of cues that run as a theatre stack. This will be used for the opening sequence of the show – to bring the band on stage. It all sounds a bit Spinal Tap for a 3 piece, but this is a tutorial.
Open up our Custom Prog view, change to playback Page 2 (using NEXT PAGE [bottom left]) and clear the programmer.
Our opening sequence will start in blackout, some music will build, we will do some groovy lighting stuff and the band will appear to rapturous applause. For the sake of the tutorial, this part of the show will be run from a single cue stack, triggered by a Go button and the odd follow on ( a cue that executes immediately after the previous cue has finished). This will not be an example of the art of lighting, it will let us get to know more features of the MagicQ.
The first cue of the sequence will actually the preset look for the audience to walk into. Dk Blues onstage @ 40%, Blinders glowing @ 10% and Beam Fans looking nice at 70%. Set that up in the programmer and hit Record, type in “ShowOpen” or something then store to a free playback on Page 2. No need to clear the programmer, we are moving on.
Next, set all the fixtures in the programmer to 0%. How you do it is up to you. You can use command line, groups or whatever. As we are in Normal mode, “tracking” doesn’t worry us and there is no need to create a blocking cue (if you don’t know what tracking is, don’t worry about it for the moment). Just “get them lights what is on and turn ’em off”, saving it on top of the 1st cue. CLEAR the programmer, it’s good practice and the next cue is going to use some different fixtures.
Before we go on, let’s take a look at what we’ve done – open the window for this cue stack by double clicking the label or “S” button of the playback. Just like when we recorded the Beam Fan chase in Part 2, we have created two cues that run as a chase by default. We need to change that with the Cue Timing softbutton. Now, the stack advances when we hit the Go (>) button of that playback.
Note: When we fire up the Preset before “doors”, we raise the fader of the ShowOpen playback. This not only sets the master intensity to 100%, it also starts the Preset Cue without pressing Go. This is because the default behaviour of the MagicQ is “Fader Activates Stack”. We don’t need to worry too much about this at the moment except to know that it happens.
Back to the stack. To keep track of the cues in the stack, we are going to name them. In the Cue Stack window, the spreadsheet has a field called “Cue Text”. To create that text, simply click on the field, type in the label and hit enter. I’ve called mine Preset and B/O so far.
Fade Times
Depending on the setup of your MagicQ PC, the cues recorded so far have default fades times associated with them. We want out blackout to happen over 3 seconds so click on the Fade field and hit 3 Enter. Set the Preset to fade in over 2 secs, so as not to cause a sudden cold/hot shock to the lamps before the show. We don’t want them blowing before we’ve started.
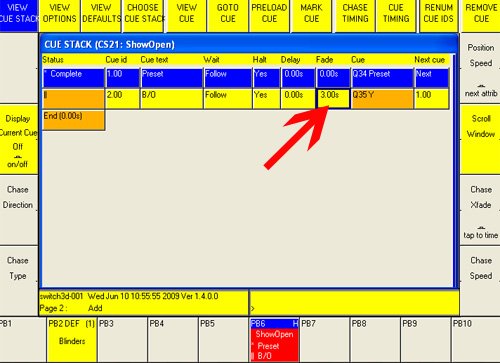
Open up the OUTPUT window to view the grid and try out the cues. The Preset comes in over 2, the B/O in 3 and the whole stack wraps back to the start with the final Go button press.
Right, next cue – go back to our Custom Prog view using CTRL + top softbutton. The next cue is going to bring up the Beam Fans, but we are going to do it is a cool way, each one starting to fade in sequence. We are going to use a bit of command line syntax for this:
Select the ALL Beam Fans Group, then enter this at the command line and watch the Output grid after you hit Enter: @# / 4 > 0/1 Enter. The hash (#) is FULL on the PC keyboard and the rest of the syntax has set a complex time across all of the fixtures in order with delay times from 1 – 4 seconds, each with a 1 second fade in.
It doesn’t matter if you don’t quite get this at first, but did you see what happened when you executed the command with Enter? The fixtures came on in sequence over time. Not only that, but the times have been added to the programmer, ready to be saved in the next cue straight away. So let’s do it – save it with REC – “Fans Up” – S button of the ShowOpen playback.
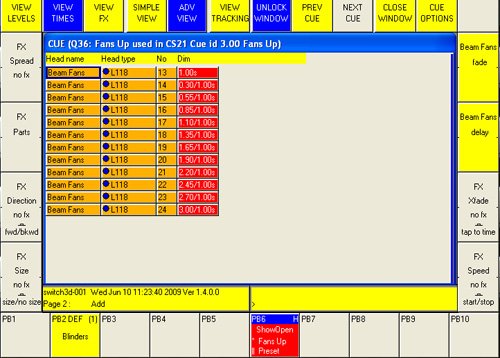
To look at what we’ve done, open the Cue Stack window again and select the new cue before hitting View Cue (top) which shows the levels of the look. To see the timing information, use View Times:

You can see a delay time of 0 > 4 seconds and a fade time of 1 second. We could change the delay range from zero the three by clicking in the field and typing 0 > 3 Enter.
It’s worth understanding that this range of delay times was applied to the whole group All Beam Fans in selection order (the order that the group was selected when recorded), which for an auto group is numeric and on our rig, left to right. A different selection order of fixtures would produce a different fade in.
Note: I recently did some troubleshooting in a venue that had allocated seemingly random fixture numbers to it’s moving heads. The above example shows the importance of creating order of your dimmer numbers, fixture addresses FROM THE START. Because our PAR rig channels were allocated in a sensible order, the auto group feature created a sensible fixture group and the cue was easy to create. If you are interested, one of the first things I did at the venue with random fixture allocations was to create some basic groups using a custom selection order tailored to their rig plan. It was either that or go round re addressing a whole bunch of moving heads rigged >8 metres over ice.
We can see the individual times of each PAR by viewing Adv Timing in the View Times window. Each fixture has it’s own set of timings for each parameter. In the case of the PARs, only intensity / Dim timing is shown.
Save the show while we’re at it. Setup – > Save Show – Enter overwrites the current file.
Next we are going to create a dimmer chase using the built in effects engine. Best practice would be to create and save the effect in the FX store, like a palette, to be used in the cue. This would mean that the effect could be used in multiple cues stored /edited in one place for easy changes in the future.. So that’s what we’ll do – this effect will be a sideways run, with snap fade ins and steps that overlap each other.
CLEAR the programmer and select All Beam Fans and set them to 50% – this sets the centre point of the effect so the fixtures will go from 0% to 100% in each cycle. Choose Add FX (top) and select a Saw wave with the icon ^.
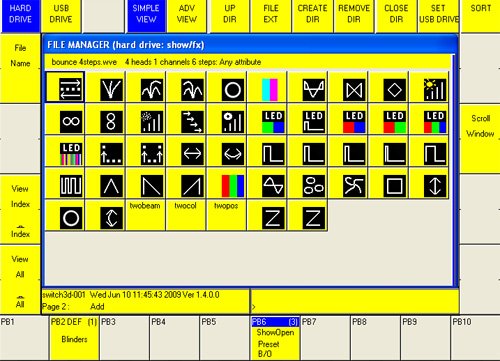
To get snap fade ins, we need to set the FX cross fade to 0 using the encoder on the right. The other most important encoder is the top left Spread adjustment. It’s currently set to Even 100%, toggle it to 0% to see what it does. The Spread controls where in the cycle the fixtures run their FX, all together or evenly spread across the entire group and anywhere in between. Have play with it and see what it does. The speed of the entire effect is controlled using the Speed encoder, bottom right. Size (the 0 – 255 amount that the effect deviates from the centre point) can be adjusted using the Size encoder. Put the Size at 255 to see a full dimmer saw between 0 and 100%, the centre point being 50%, with a smaller effect when set to 128.
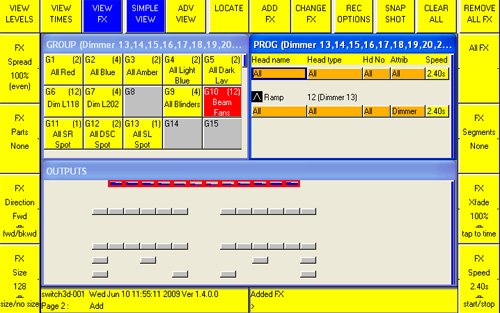
When you are finished with the effect, store it in the FX store ready to be used in the next cue or any other cues when the mood takes you. Open the FX window, press REC – > type in “Beam Wave” – > and click an empty square in the FX window.
Clear the programmer, select All Beam Fans again, apply the effect from the FX window and save to the next cue in our stack. Test the stack by running through the cues.
To be clear, the last cue we recorded was an effect generated by the console. We could have selected the fixtures, assigned the Dimmer Saw and and recorded it straight into the cue.
Instead, we chose to record the effect to a kind of FX palette. This can then be used in many cues with different fixtures using a single reference point for adjustments and editing. The effect itself is recorded and that effect is then recored to the cue. This gives us two choices when it comes to edits – directly in cue or via the FX store and there is a distinction.
An edit to the effect in the FX store will change the effect in that cue and any others it has been used in.
An edit to the cue will change only that cue and break the link with the stored FX. The cue now has it’s own effect data.
Use INCLUDE – > FX window slot or INCLUDE – > Cuelist / Cue then UPDATE respectively.
Cue Stack Timing Options
Now we have a simple four cue theatre stack, it is worth a quick look at a few of the timing and related options you will want to know about at this stage. Open the window of our ShowOpen stack by doubling clicking the S button over the fader.

With the View Stack softbutton activated we can see the list of cues in the stack, plus other information relating to playback of each cue. They include:
Wait – The wait time between the Go command being given (the Go button, for example) and the cue executing. Follow indicates no wait time – an immediate Go with the command.
Halt – This sets the behaviour of the cue, relative to the previous one and can change the cue into a follow on (one that executes straight after the previous cue has finished running). The simple options are Halt – Yes (wait for the next Go command) or Halt – No (execute as soon as the previous cue has completed).
Delay – We have already come across delay set across our fixtures which is a good example of delay in action. Delaying individual fixtures or attributes (with complex fixtures) can produce a variety of cue executions in one place. The distinction with Wait is that Wait is waiting for the whole cue to execute whereas Delay can be more detailed.
Fade – The Fade in time of the cue which can be set globally or to individual fixtures or attributes, similar to Delay.
Next Cue – The default setting of Next fires the next cue number in the sequence, numerically speaking. Setting Next Cue to another cue number allows you to create jumps in the stack.
We are not really concerned with the remaining options in this spreadsheet today so let’s finish our look at cue stack timing by reminding ourselves how to see more complex timing information.
Choosing a cue by highlighting it in the Cue Stack window using the left hand field, pressing the top softbutton View Cue brings up data about that particular cue. View Levels shows us the channel level information while toggling View Times shows us a detailed breakdown of the timing data. In Simple View, this gives us global time setting for each attribute (in our case we only have Intensity). Advanced View shows us timing information on a per fixture basis. If we had complex fixtures like moving heads, this would also enable us to see individual attributes like Pan and Tilt.
Not only can we view the timing data, we can also change it from here too – Simple for global changes and Advanced for detailed ones. So you can see how we have started to get into quite a powerful but complex area of lighting control. We’ll leave timing there for today.
Finally, the end of the beginning.
This series of MagicQ PC tutorials was designed to give simple but practical examples to help you find your way through the minefield of learning a complex lighting console. We started with a very simple rig, had some clear goals and patched and programmed our way to better understanding.
There is much to learning professional lighting consoles and On Stage Lighting will be looking at further aspects of the MagicQ PC at some time in the future, including moving lights and running complex shows. For now, you have a much better understanding of the basics of the Cham Sys MagicQPC (and, by default, many others) that you can take to the next level. If you have been keeping up, here’s what we know so far – I think you’ll be pleasantly surprised:
- How to start a show on MagicQ PC and set a DMX Output device.
- How to patch up generic fixtures with good labels and colour information.
- How to navigate around the MagicQ and basic routines such as Copy, Move and editing data.
- How to set up custom views and create your own workspace.
- How to set up a Grid and use it as a virtual fixture plan.
- How to use Auto Groups and create your own selection tools.
- How to handle channel data and set up looks using different methods.
- How to use the programmer to manipulate fixture data.
- How to create playbacks on MagicQ PC and use Copy and Move keep a tidy house.
- How to use the tools for editing cues and chases.
- How to create a theatre stack on the MagicQ and alter timing information.
- How to use the shape generator to create complex lighting effects quickly.
- How to apply complex timing across fixtures and attributes.
While working through those big tasks, you have started to really get to grips with the fine details of navigation and workflow on MagicQ PC and I hope you feel more confident on the console. See you next time.
Rob Sayer HND PGDip FHEA is a Senior Lecturer in Technical Theatre Production, mentor, and consultant in stage lighting and education. As a professional lighting designer, Rob designed and programmed theatre performances, music festivals and large corporate events for blue chip companies while travelling all over Europe. With a background in theatre, he combines traditional stage lighting knowledge alongside fast moving lighting and video technology in the world of commercial events.

Thanks for the series Rob – keep them coming!! For anyone who had problems entering the command “@#/4>0/1” you have to go to “Setup” > “Keypad Encoders” > “Auto Enter on Keypad Intensity Set” and set to “No”.
Hi Jim, thanks for bringing that up. It’s an issue that has caught others out in the past. The trouble with modern consoles is that there are so many user defined variables, everything has to be qualified with a “this only works if you have got x set to 3 and don’t have z enabled. And are in mode 3”.
Rob, great little series, look forward to the moving light one
Thanks
Thanks so much for these tutorials. Just curious as to when you are going to release your moving light tutorials?
Hi Ryan. Although I’ve got a lot this year and next, I am planning to get the first MagicQ moving light tutorial out before xmas. These tutorials take a good deal more time than other articles, what with the planning of the excercise for maximum learning, step notation and screen dumps before finally writing the thing and getting it on the site. Stay tuned.
Thanks for your reply. I am excited about these tutorials coming out. I accidentally stumbled across Magic Q one day when playing around with Freestyler. I was doing some research on PC based lighting and found it although I haven’t had a chance to use it or learn it. I did a big light show for a local church using Freestyler and 44 fixtures. It was a bit unweildy using Freestyler but I managed. I had a certain budget that I was working with and I wanted to try and maximize it, so I cut out the expensive rental of the Avolites controller I loved. I suppose what I am looking for is better programming techniques and being able to utilize things like timecode and such.
Thanks Rob for the 3 parts to this ChamSys MagicQ tutorial.
Honestly I am mightily impressed and it is not a wonder now why Lampies harp on about using a proper lighting console (be it software or hardware). I have never seen the “proper” way to use a console before, I have only used “other” lighting control software and none have the power and simplicity that you showed us with these tutorials.
I cannot wait for your tutorials on moving lights, but looks as if I will have to wait.
I might just have to take a trip down to ChamSys and have a play on the real consoles and decide the way for me to go. Save pennies for a full console or get wings for the MgaicQ PC. I think it might be the full console.
Once again thank you so much Rob for opening my eyes.
Hey Onge
Thanks for your kind comments on the MagicQ tutorials. It’s funny how things that seem obivous to “us” prgrammers aren’t to everyone else. I’m glad you got a lot out of the tutorials and yes, I have a half finished MagicQ moving light tutorial on the drawing board. Just need time to finish it ;-)
Hi Rob,
Good to know that the moving light tutorials are on the burner so to speak.
Time … yes never enough for what you want to do but more than enough for what you need to do.
I do know what it takes to write tutorials, especially ones that are of interest to as many levels of user as possible. I have created tutorials for 2 other pieces of lighting control software. The hardest part for me is to remember to include the parts that we take for granted.
Well back to the MagicQ PC to learn and practice more and wait patiently for your tutorials ;)
Best reagrds
André
Hi :) This has been great thanks! It has helped me a lot!
Just one small thing to point out is that the link to Part 1 at the beginning of this article actually links to Part 2!
Thanks very much,
Hallam :)
Thanks Hallam. And link all sorted now :)
Thanks for the tutorials… I tried using INCLUDE and UPDATE on an FX slot, which worked except the cue stack that FX was recorded to in the PLAYBACK didn’t update to reflect the changes I made. What am I missing?
Are you sure that you used the FX slot contents to record the cue and didn’t alter it? I haven’t actually looked at this function on the MagicQ in detail, it depends if the FX is recorded in “palette” style on MagicQ cue stack as simple channel levels or actually FX001 etc.
sir dont you have a video of our tutorial